Branches of Government & Checks and Balances Drag and Drop Activities

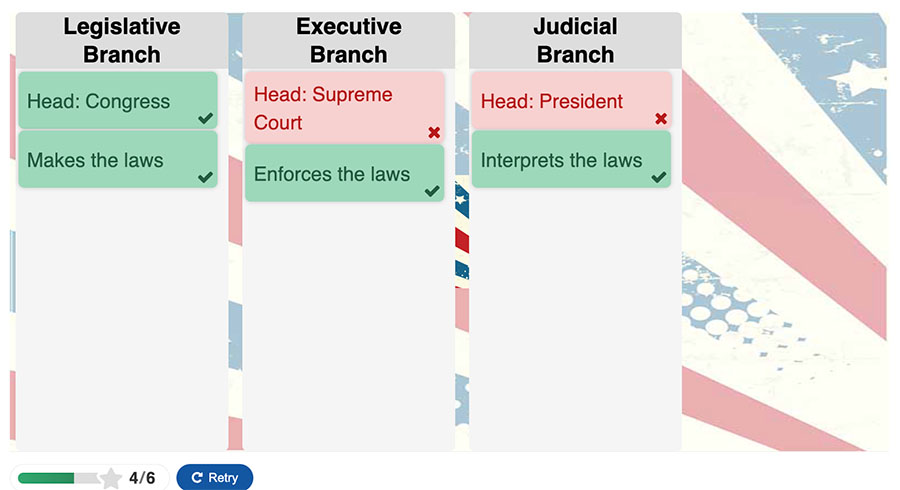
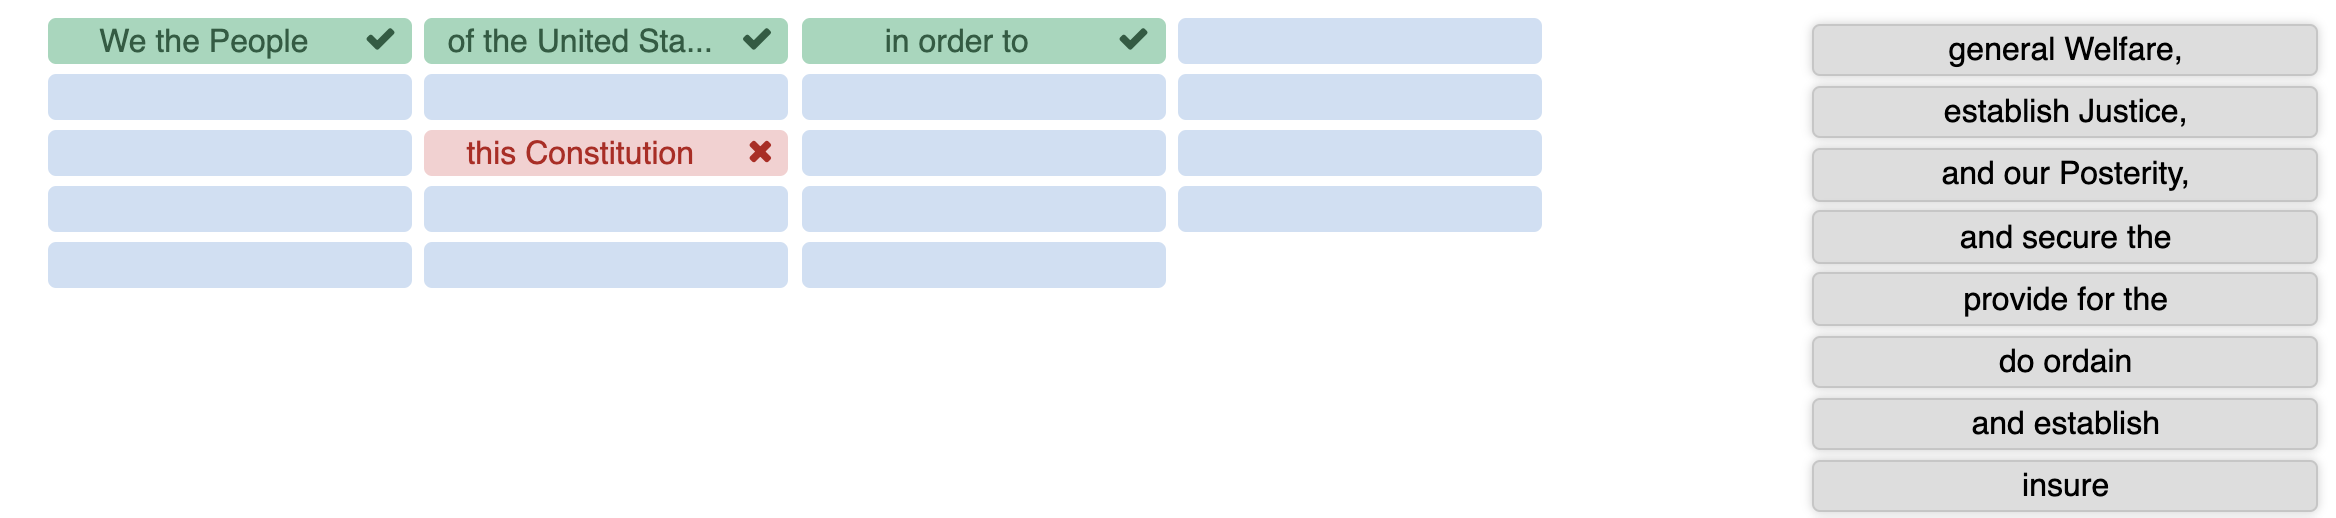
I’ve been trying out some new software to add interactive student activities to the website. Try the two drag and drop activities that I added below! One is the basics of the 3 branches of government and the other is a review of the basic checks and balances of each branch.

How You Can Use This In the Classroom
  • Use it during a unit on the Constitution as a review at the end of class. (Students can do it individually on their devices or you can project it and complete it as a class. See the QR code at the bottom. Students can scan it with their devices!)
  • Use it at the beginning of class the day after you have taught the information as a review.
  • Assign it as an exercise for students who finish their work early.
  • Use it at the end of the semester to review for an end of course test.


Have your students scan this QR code to quickly access these activities! (You can also access them under the “For Students” page.

Do you want to see more drag and drop review activities? Use my contact form to let me know!

How to Find Interesting Facts for Your Lessons

Guess what I came across today…a photograph of Dolley Madison! Yep, an actual photograph (see above)! It was taken in 1848 by Matthew Brady (of course) when she was 80 years old! How cool! How have I not seen this before?! There’s something so raw about historical photos that can’t be conveyed by paintings.

So, how did I come across this photo? I was researching James Madison for a lesson about the Constitutional Convention. I’ve taught this subject plenty of times, but I was making a new set of notes, and I wanted to double-check my facts and see if I could find out anything new. While I was reading about James Madison, I fell down a rabbit hole reading about his relationship with Dolley.

I found out so many cool things! For example:

  • Dolley Madison’s first husband and one of her children died during a yellow fever epidemic. She was widowed at 25.
  • Aaron Burr, the man who eventually killed Alexander Hamilton in their famous duel, introduced James Madison and Dolley. He knew Madison from college and was staying in Dolley’s mother’s boarding house.
  • Dolley served as hostess for widower Thomas Jefferson when he was President. James Madison was Jefferson’s Secretary of State at the time. Dolley selected furnishings for the White House, organized parties, and entertained ladies that visited.
  • Dolley was 17 years younger than Madison, but they were known to be very much in love and were married for 42 years.

I also found out things that had nothing to do with Dolley Madison but were well worth remembering. For example:

  • George Washington only had one real tooth left at the time of his inauguration.
  • Teddy Roosevelt was known as the smiling president. He was the first president who was documented as smiling for photographs. He was so well-known for his smile that a Teddy’s teeth whistle was created for his 1904 presidential campaign. One is on display at the Smithsonian National Museum of American History.

Almost every one of these facts would pique students’ interest or at least break the monotony of class. How did I find out these facts? By reading up on what I was teaching. Now, I know you won’t always have time to read up on everything, especially if it’s something you have taught before and feel like you already know. Sometimes we are lucky that we even made it to school with a shower and clean clothes; forget having time to read about George Washington’s teeth (or tooth).

BUT, there are those days where you spend too much time on Facebook, right? Or watch one-too-many TikToks? Or read another click-bait article? Instead of using ALL of that time for mindless entertainment, why not take a minute to Google the person you are teaching about tomorrow?

And while we are on the subject of Googling, let me mention a VERY important point. Don’t believe everything you read on the internet. Ok, I know you don’t believe everything you read on the internet, BUT do you take time to fact check the bits of trivia you come across? A quick search of the Dolley Madison photo may reveal that actual photo taken of her, but you will also come across various fake photos of her and James Madison. It didn’t take me long to research and find out that John Quincy Adams was the first president ever photographed, and that was after James Madison was already dead.

If it’s not a well-known fact, verify it using several well-known sources. It typically takes less than a minute to verify something. All of the facts that I shared above were verified by either government-run websites or those run by historical societies that are reputable. And no, a person’s blog is not considered a reputable source (unless it’s mine, of course). 😉 Also, if you come across a quote from someone or about someone that seems very controversial or “off,” make sure you look at the context of the quote. People can twist quotes to suit their own political biases. We expect our students to use reputable sources for schoolwork so we should do the same.

So, next time you dread teaching the SAME lesson about the SAME person again this semester, try doing a little bit of reading. You never know when you’ll come across the one interesting fact that can grab that one student you’ve been trying to reach!


Free Interactive Drag and Drop Review Activities

I’ve figured out a way to add some drag and drop reviews to my site, and I am SO EXCITED! I’ve already made one about the Declaration of Independence and the Preamble to the Constitution. I used to make my students memorize these passages. This would have been a great help! I can’t wait to make more of these! I’ll be posting all interactive review activities on my website under the For Students tab.

Eli Whitney Videos and Cotton Gin Craft

Eli Whitney.  You’ve all heard of him.  You know, he’s that guy that indirectly led to an increase in slavery and all of that horrible stuff.  He was just trying to help make life easier (and make a little cash in the process), but his ideas made a HUGE impact on America.

I taught a lesson on Eli Whitney this week.  In my opinion, you need to make sure your students know 2 things about Eli Whitney:

1- He invented the cotton gin

2- He came up with the idea of using interchangeable parts in manufacturing

It can be hard to visualize how the cotton gin works without seeing one (or at least a diagram of one).  I found the BEST video I have ever seen showing the operation of a cotton gin.  Now granted, this video is in black and white and is probably older than me, but there is no better video that I have found which has clear shots of the teeth in the wheels.  When you show this to your students, just let them know ahead of time that it is an older black and white video and that there is a cheesy guy in a wig pretending to be Eli Whitney.

(Side note:  I have often found that students tend to dismiss something they see as old or in black and white IF they haven’t been prepped for it.  Before I show an older video, I always explain that the video explains or illustrates something so much better than other videos that it still has relevance and is worth showing.  Once I acknowledge any obviously cheesy moments or outdated phrases or clothing, it takes away much of the novelty of it, and the students can move past it and just absorb what the video is showing.)


Another “decent” video (although NOT the History Channel’s best production) is this one.  You may want to use this in between your discussion of the cotton gin and interchangeable parts.

Now, here’s what I’m REALLY proud of!  I decided that I wanted to have my students make some kind of crafty-type thing to help them remember how the cotton gin worked.  So I enlarged and printed the picture below on cardstock (you could use regular paper too if you had to).

I then gave my students some glue, cotton balls, and unpopped popcorn kernels (to represent cotton seeds).  They had to glue the stuff on the diagram in such a way as to represent what the cotton gin did.  Use liquid glue if you do this.  None of this will stick if you use a glue stick.  Also, tell your students to tear apart the cotton balls into smaller chunks.  The balls will last longer, and it just looks better.


Now, this will seriously take less than 5 minutes, so why should you do it?  Because sometimes your students need to do something hands-on.  Because sometimes your students need to do something other than take notes.  Because sometimes you need to do something different.  And if you think this craft may be too “childish” for your kids, I think you underestimate how refreshing a change of pace is when you are sitting in class and listening to people talk all day long.  Did I mention that it would be GREAT reinforcement for tactile learners…or really anyone?

If this idea is too simple for your “high-minded classroom ways,” (haha) try this:  Divide your students into small groups and give them a poster board, cotton balls, popcorn, and glue and say…”Make me a diagram of a cotton gin.” or “Make a poster demonstrating how a cotton gin works.”

Before you get your students pasting and crafting, you need to reinforce the impact of the cotton gin.  It is pointless for your students to know how the cotton gin works if they don’t know the impact it had on the South (and really the world).  I used a table to show the students the difference the cotton gin made.  Have them cut out each box and put it in the correct spot in the chart.  (See link at the bottom of the article.)

One thing that you need to discuss when covering the effects of the cotton gin is the positive and negative effects of the invention.  Have a brief discussion about the good and bad that has resulted from various inventions (start off discussing the cell phone).  Have students do some deep thinking about consequences and cause and effect (maybe a short free-write).  Many people talk about the fact that the cotton gin led to an increase in slavery but often overlook the fact that the cotton gin also provided a way for poor farmers living in the South (who didn’t own slaves) to better support their family.  Also, cotton provided the raw materials necessary for textile mills to expand which provided more jobs.

Once you cover the cotton gin and move on to interchangeable parts, there’s more fun stuff to do.  After explaining interchangeable parts and their importance, may sure you show them that they are surrounded by hundreds of examples of them.  You can use your board markers as a handy example.  If you lose the top to one, you can replace it with another.

Have your students go on a scavenger hunt around the room for examples of interchangeable parts.  You can divide them into groups and have them race.  Whoever gets done first is the winner and gets candy or extra points on a quiz.  I would make them find about 30 different examples within the classroom.  Or, you could also set a timer and see which group can come up with the most examples of items with interchangeable parts in the time allotted.  Pretty much anything with a screw has interchangeable parts.  In fact, a screw is an interchangeable part!  Students are probably wearing examples of items with interchangeable parts as well:  watches, zippers, buttons, earrings, etc.

A word of warning, apparently there is a theory out there called the Mandela effect, where a group of people collectively remembers something wrong.  There’s a bunch of articles devoted to this.  Well, some crazy people claim that Eli Whitney was black and that he invented the cotton gin to reduce the work of slaves.  It’s a crazy Internet theory with no reliable evidence, but there’s always that ONE kid in class who’s read stuff like that and brings it up.  Haha!  The point is, the cotton gin changed the course of American history, regardless of the physical characteristics of the inventor!

Here’s a link to my cotton gin table.  It’s pretty simple.  You can add more stuff to it if you would like (specific statistics about cotton production and slavery).  The fonts may look weird if you don’t have them on your computer.


Featured image courtesy of Dsdugan – Own work, CC0, https://commons.wikimedia.org/w/index.php?curid=58026846

Tips for Remembering Constitutional Amendments

Do you know about ALL of the amendments to the Constitution?  Can you tell me what each one changed or added to the Constitution?  I can’t (gasp).  I’m betting your students can’t either (and probably you neither, unless you’ve been teaching Civics for a while).  Well, I found this video that gives some quick pneumonic devices to help you remember some of the more important amendments.  You don’t necessarily need to show this to your students, but I would watch it and go over these tricks with your students (and use them yourself).  The tip about the Reconstruction amendments is pretty helpful.

The one that he didn’t cover, which I think is super-important, is the 19th amendment, which gave women the right to vote.  I actually scoured the internet (ok, I looked for 10 minutes) to see if anyone else had tips for remembering the 19th, and I couldn’t find anything useful!  I used to tell my students to imagine a bunch of women standing in line to vote wearing t-shirts that say “19” or imagine a bunch of girls jumping up and down squealing, “I’m 19!”  You know, that would be a good extra credit assignment; have students come up with easy and creative ways to remember the some of the important amendments.

Do you have any neat ways to remember amendments?  Leave them in the comments below!

Help Students Memorize the Preamble to the Constitution

I am helping my daughter memorize the Preamble to the Constitution.  I think it is imperative that ALL citizens of this country memorize at least the introduction to our governing document.  The Preamble is a good reminder of why this country was founded and what the purpose of our government truly is.  I do NOT like the idea of making my students memorize a lot of random dates, but I always made my students memorize (and be able to explain) two things every year in US History:  the Preamble to the US Constitution and the first line of the second paragraph of the Declaration of Independence (“We hold these truths…Life, Liberty, and the Pursuit of Happiness.”).  I did not, however, just give the text to my students and say, “Memorize this.”  We worked for a few minutes in class every day for about a week, and then students had to recite it.

I wrote the various words and/or phrases of the selected text on various pieces of construction paper.  I divided the text up into bits that equaled the amount of students in my largest class.  So if my largest class had 28 students, I divided the text up into 28 chunks.  This way, each student had a piece.  In the smaller classes, I just gave a few students 2 chunks if there were extra pieces.  Then I did this:

  • Time the students on how quickly they can line up so that the words of the Preamble were in the correct order.
  • Read the words of the Preamble as a class.
  • Mix up the words and do it again, trying to beat the previous time.  If the students are successful, they get a reward (like candy or a few free minutes at the end of class).
  • Repeat this exercise each day until you are confident that most students know it.
  • After the second day, I don’t allow students to talk when they are moving around with their pieces.  It makes things a little harder (and more interesting).

The day of the unit test, students had to come up and say the Preamble to me after they took their test.  I didn’t make students say it in front of the class, because I had some students that knew it but just couldn’t handle saying it in front of others.  The recitation was worth 100 points.  I allowed the students to start over as many times as they needed, but I subtracted 5 points for every prompt required or word missed when they said it the final time.  One thing I did notice was that many students seemed very nervous having to come up and say it to me.  I think it’s intimidating for some students to have a teacher’s undivided attention while reciting something from memory, so be sure to smile and be encouraging.

When learning the Preamble, you can also show the the School House Rock video.  It’s older, but the song is very catchy.  (Just be aware that they leave out “of the United States” at the beginning.)

I also recently found this rap.  The video quality is not very good, but the rap is pretty catchy.  You could try to recreate it for your students or let them watch it and perform along with it.  (You’ll have to read your students’ attitudes and whether they will be willing to do this one or not.)

I also found this free memorization sheet that would great to use if needed.

LTH 004 – John Adams and His Presidency

In this episode, I’ll discuss how to teach about John Adams and the important events of his presidency.  You’ll get resources to help you cover the XYZ Affair, the Quasi-War with France, and the Alien and Sedition Acts.  Be sure and check out the show notes for all of the resources I mention!

Show Notes and Resources:

Bell Ringer, Attention-Getter, Exit Tickets, and Assignments

Important Terms/Concepts to Cover

Outline Summary of John Adams Life and Presidency

John Adams Powerpoint

Political Career of John Adams – History Channel Video (scroll down – second video on the page, 5 min.)

John Adams 60 Second Presidents – PBS Video on Youtube (1 min.)

Biography of Abigail Adams – Biography.com Video (3 min.)

Worksheets:  Looking at XYZ Affair and Alien and Sedition Acts from Both Sides (scroll down to page 8)

Worksheet:  Graphic Review of XYZ Affair and Alien and Sedition Acts (use as review the next day)

XYZ Affair Parody Song/Video to Wham’s Careless Whisper


Photo Official Presidential Portrait of John Adams, Public Domain
Intro music clip of “I Dunno” by Grapes CC BY-ND 3.0